One of the most frequent and reliable processes I develop involves transferring data between spreadsheets. This task is essential for several reasons:
- Refreshing and Updating: Whether it’s pivot tables that need refreshing or custom views that need updating, regular data transfers keep your spreadsheets current.
- Data Formats: Often, incoming data isn’t in the format you need. It might come with extra details or in configurations that require filtering.
- Data Transformation: Sometimes, the data needs a bit of tweaking or transformation to fit into another sheet.
In this post, I’ll guide you through creating a flow that tackles all these challenges efficiently.
Before we begin, you should plan out if this is going to be a consistently updated spreadsheet. E.g. You are going to refresh or update data and generate a report every day.
If so, follow this Excel preparation guide here: https://powerautomatelab.com/excel-reporting-and-preparation/
Flow Time
Every morning, we extract a report from one of our corporate systems. While this report has great data, the system itself lacks strong reporting capabilities. This is where Excel proves indispensable. We transfer the data into a spreadsheet to enhance its presentation and readability. For those interested in a more advanced solution, Power BI could be explored in a future discussion.
Trigger
To start a flow in Power Automate, you first need to set up a trigger, which is an event that initiates your flow. For flows that perform complex tasks or processing, it’s best to use a ‘Manual’ trigger.
To manage when your flow runs, you should create a separate flow dedicated to scheduling. This approach lets you tailor the trigger logic or turn the scheduling on and off without affecting the main flow’s operations.

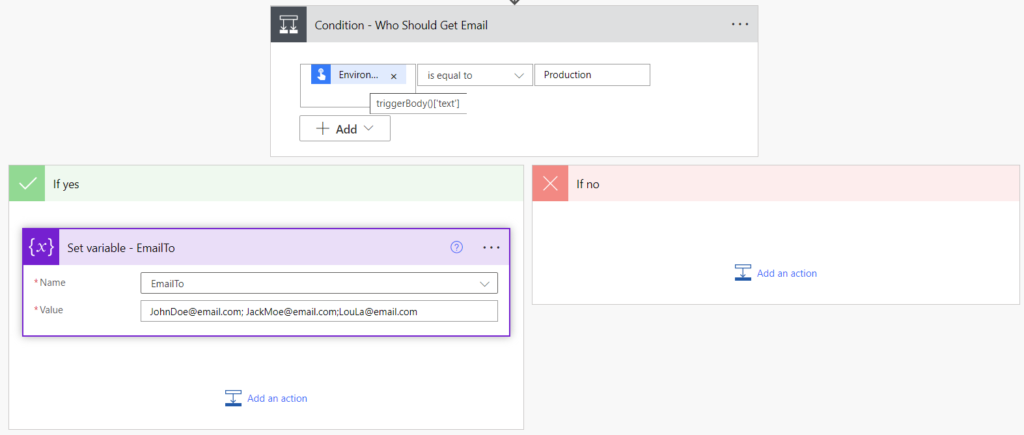
I am working in a single environment, so i like to define a parameter that will allow me to do testing even after a flow is running in production state. If you are working in a development/production environment, then you can skip that requirement.
Now, i want to declare 3 variables that will be used in the rest of the flow as per the below.
- EmailTo will contain who an email notification will go to, and this will change depending on if we select “Development” or “Production when we run the flow.
- File to Copy From will contain a path to the file we want to retrieve data from.
- Master Data will contain a path to the master data file containing all the records.

I like to keep my paths in variables so that i dont have to reenter the path in multiple places if it changes and so that excel defaults to using JSON when updating a row.
This next part is optional but can be used for anything, even the paths we defined above to switch between a development or production run.

Now we head into our Try scope and the first step is to convert the data into a table so Power Automate can work with it.
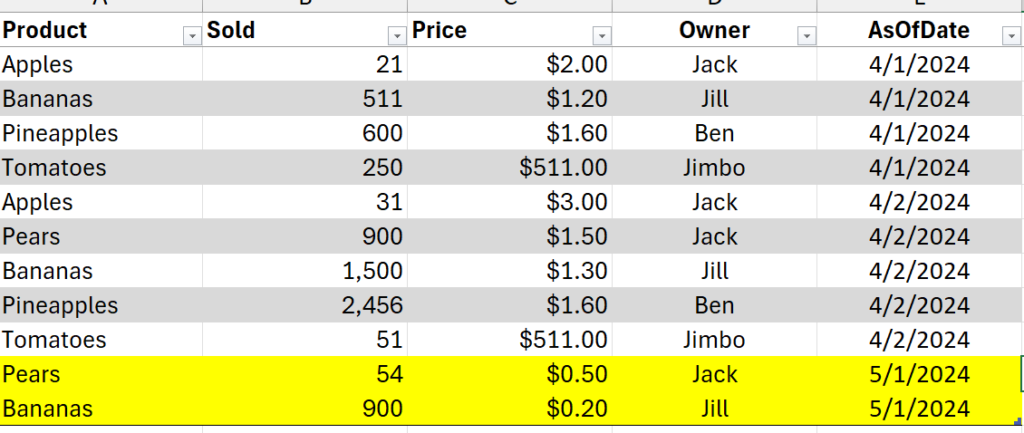
Here is the data we are going to be working with.

We want to use a shared script that will allow us to specify what data to turn into a table and also assign it a name for easy referencing in the flow. The code for the script can be found here.

Now after any considerable action taking place in OneDrive or SharePoint, i always add a delay step to ensure the cloud is all synced up. Feel free to remove this or play around with the timing to make it tighter if that is important.

Now that the data is in a table we can use the List rows present in a table action to pull all the rows we need. In the next few steps im going to show you 3 ways to filter out what’s important just for your reference.

So here we will use the Filter Query option to make sure we dont pull in any rows for ‘Apples’. Next i want to ensure that we are only working with the columns important to us so we will use a Select step which allows us to limit the returned columns, define new column names, and reformat the values if needed.

- From:
@{outputs('List_rows_present_in_a_table_-_Copy_From')?['body/value']} - Map:
@{item()?['Product']}@{item()?['Sold']}etc.@formatDateTime(item()?['AsOfDate'],'MM/dd/yyyy')
Now lets filter it again using a Filter Array step to get ONLY pears and bananas.

- From:
@body('Select_-_Only_Important_Columns') @or(equals(item()?['Product'], 'Pears'),equals(item()?['Product'], 'Bananas'))
Now we will loop through this filtered down data and add it to our master file. I much prefer to use JSON to create the update schema as its very flexible and can be edited in an external text editor if you are doing a lot of code edits.

- Select an output from previous steps:
@{body('Filter_array_-_Get_Pears_and_Bananas')}
{
  "Product": "@{items('Apply_to_each_-_Records_to_Copy')?['Product']}",
  "Sold": "@{items('Apply_to_each_-_Records_to_Copy')?['Sold']}",
  "Price": "@{items('Apply_to_each_-_Records_to_Copy')?['Price']}",
  "Owner": "@{items('Apply_to_each_-_Records_to_Copy')?['Owner']}",
  "AsOfDate": "@{items('Apply_to_each_-_Records_to_Copy')?['AsOfDate']}"
}- Excel -> Row:
@{outputs('Compose_-_JSON_Schema')}
Finally, once all the records are copied over, lets send out an email with a link to the file.

- Subject:
Inventory Report Updated: @{formatDateTime(convertTimeZone(utcNow(), 'UTC', 'Eastern Standard Time'), 'MM/dd/yyyy')} - Body (use HTML editor button at far right of editor window):
<p>The Inventory Report is now up to date. Please follow the link below to access:</p>
<p><a href="www.reportlocation.com/Report">OneDrive Report</a></p>
Now the flow is complete and ready for testing. Execute the flow and you will have an updated Master Data file like below.

If you have a pivot table or chart on another sheet that is referencing this table. Now those elements are being automatically updated with the additional data like below.

There are still 2 remaining items for this flow that we will go over in other posts:
- Creating a PDF of the report for distribution
- Scheduling and creating copies of the master report for distribution.
Until next time!
